Features Specs FAQ Download

How to make Harmonimo
work for you

We are still in the early days of building Harmonimo
if you have any issues please contact
info@clayworksaudio.com.

General Questions

What is Harmonimo?

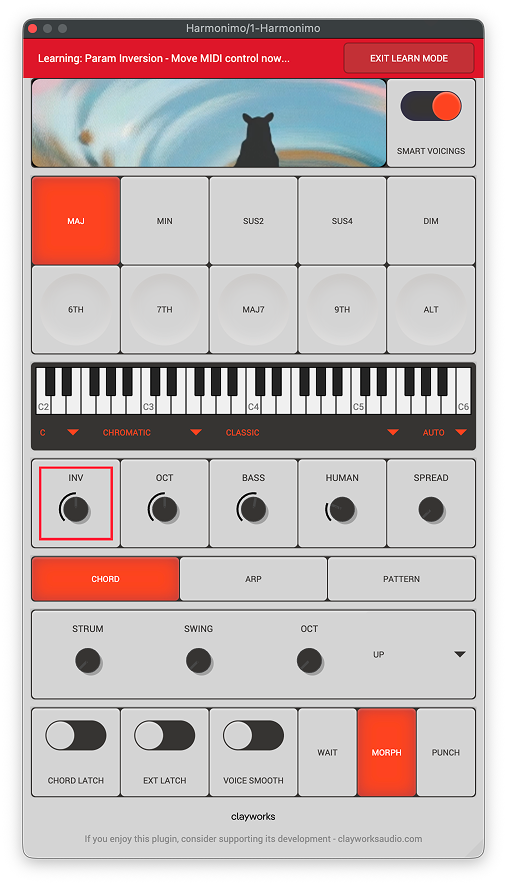
Harmonimo is an expressive MIDI chord generator plugin that transforms single notes into full chords with genre-specific voicing. It's designed for producers, composers, and performers of all levels who want to create complex chord progressions quickly. Play one note, get a full expressive chord with proper voicing, extensions, and musical intelligence.

Harmonimo is perfect for:

  • Producers who want fast chord workflow without deep music theory knowledge
  • Live performers who need one-handed chord playing
  • Neo-soul, jazz, gospel, and lo-fi producers wanting authentic extended chords
  • Anyone wanting to explore harmony quickly and musically
  • Beginners learning chord progressions in context

Supported platforms & plugin formats.

Harmonimo is supported on:

  • macOS: 10.13 (High Sierra) or later, both Intel and Apple Silicon (M1/M2/M3) natively supported
  • Windows: Windows 10 or later (64-bit)

Harmonimo is available as:

  • VST3
  • Standalone Application

How to install Harmonimo.

Harmonimo automatically comes with both VST3 and Standalone versions for the platform of your choice.

MacOS
Extract the ZIP and place Harmonimo in your applications folder and Harmonimo.VST into 'Macintosh HD/Library/Audio/Plug-Ins/VST3/'

Windows
Simply run the installer and Harmonimo should be ready to use

What is Smart Voicing?

Smart Voicing

Smart Voicing is an intelligent system that automatically enriches your chords with tasteful extensions. It considers:

  • Key (C Major, D Lydian, etc.)
  • Harmonic function (tonic, subdominant, dominant)
  • Progression context (detects ii-V-I, V→I resolutions, etc.)
  • Chord degree in the current key
  • Genre preferences (Neo-Soul loves #11 on IV, Jazz uses altered dominants)
  • Tension (Low, Mid, High)

When Smart Voicing is ON and you haven't manually selected extensions, Harmonimo automatically adds 7ths, 9ths, and other extensions that sound musical in context.

Chord types & Extensions.

Chord types and Extensions

The chord panel contains both chord types and chord extensions. Simply press the chord type and extension you want to try different sounds and voicings.

Chord extensions can be combined to create more chord types.

The chord panel will work automatically with 'Smart Voicings' turned on - but will over-ride them if you choose to select manually.

We advise connecting these to midi pads for the best control.

Hotkeys
Chords: 1,2,3,4,5
Extensions: Q,W,E,R,T

Keys, Keyboards & Genres.

Keys, Keyboards and Genres

Keyboard
The visual keyboard shows you the current played note, the chord that is being played and the available notes in the current selected scale.

Key & Genre Selector
Select the 'Key', the 'Mode', the 'Genre' and the 'Tension' to set up Harmonimo for the style and sound you are after.

Tension controls the spread of the chord to create different feelings, Auto will modify the value based on the degree or progression context.

Expression Controls.

Expression Controls

Expression controls are made to give you finer control over the expression and voicing of your chords.

Inversion
The rearrangement of a chord's notes, so that the lowest note is no longer the root, creating a different sound or texture while keeping the same core notes. A great expressive control we advise connecting to a MIDI dial.

Octave
Changes the octave relative to the played note, useful for smaller keyboards

Bass
Moves a single bass note relative to the chord, it may overlap with the voicing you already have. Turn it all the way left to turn it off.

Humanise
Humanise adds subtle random variations to timing, pitch, and velocity for a natural, human-played feel. Amount slider controls intensity (0-100%). Works across all performance modes.

Spread
Spread (0-100%) dynamically adds notes in bass and treble registers to make voicings fuller. At 0%, you get the core voicing template. At 100%, you get additional bass foundation and treble sparkle.

Performance Modes.

Three modes for different playing styles:

  • Chord Mode: Instant chord playback with optional strum (adjustable speed, direction, swing)
  • Arpeggiator Mode: 10 patterns (Up, Down, Up-Down, Converge, Pinky Up, Random, etc.) with adjustable rate, gate, and octave span
  • Pattern Mode: Rhythmic sequencer with 8 preset patterns (Pump, Offbeat, Gospel, Syncopated, etc.)
Chord Mode

Chord Mode
Instant chord playback with optional strum (adjustable speed, direction, swing)

Strum
Strum allows you to dial between blocked or broken chords. Its a great parameter to connect with midi for more expression.

Swing
Swing in Chord Mode applies to the Strum feature and creates a "shuffle" or "swing" feel by delaying every other note in the strum sequence.

Oct
Adds a second octave to your chord by doubling up the notes.

Direction
Changes the direction of the strum feature.

Arpeggiator Mode

Arpeggiator Mode: 10 patterns (Up, Down, Up-Down, Converge, Pinky Up, Random, etc.) with adjustable rate, gate, and octave span

Direction
Strum allows you to dial between blocked or broken chords. Its a great parameter to connect with midi for more expression.

Rate
Swing in Chord Mode applies to the Strum feature and creates a "shuffle" or "swing" feel by delaying every other note in the strum sequence.

Oct
Adds a second octave to your chord by doubling up the notes.

Gate
Changes the direction of the strum feature.

Swing

Skip

Pattern Mode

Harmonimo VST3

How to install the VST with Ableton.

You can install and use Clayworks Harmonimo like any other VST, please see the Ableton Live manual on the subject

Mac OS

Windows

Mapping MIDI controls in Ableton Live.

Mapping Harmonimos parameters to a midi device is a great way to unlock much more expressive play styles. We love to have at least inversions and strum mapped to dials to help create more interesting and dynamic chords.

Due to the way Ableton Live handles sending MIDI to VSTs (by compressing all MIDI channels into 1) we have provided two routes for mapping midi inside Ableton each unfortunately has its drawbacks.

Map inside the VST

  1. Connect Harmonimo to a track to open it inside Ableton Live.
  2. Click the Harmonimo settings icon (top right).
Harmonimo Settings
  1. Click the 'New Mapping' button to enter MIDI learn mode.
New Mapping
  1. Click Each parameter you want to map, it should highlight RED, now press the corresponding midi control on your keyboard to map it. Messages at the top should let you know if you are successful.
MIDI Learn Mode
  1. Press 'Exit Learn Mode' at the top.

Harmonimo is now ready to play with your MIDI setup.

We recommend mapping the Chord and extension buttons to pads, and the other parameters to dials for the most control and expressive playing.

If using the pads, you may find that your pads and keyboard are interfering with each other due to crossed channels. If so you may want to consider using Harmonimo Standalone, Or continuing with Ableton Lives in-built MIDI mapping.

Map using the in-built Ableton Live MIDI mapping

To map Harmonimo using Ableton Lives in-built MIDI mapping system simply use the 'unfold device parameters' arrow to expose all the parameters and use CMD+M (Mac) or CTRL+M (Windows) to start mapping.

Which DAWs work with Harmonimo?

Harmonimo should works with all major DAWs including:

  • Ableton Live 11/12
  • FL Studio 21+
  • Logic Pro 11
  • Cubase 13+
  • Reaper 7+
  • Bitwig Studio 5+
  • Studio One 6+
  • Pro Tools (with VST3 support)

If you have trouble you can also try using the standalone Harmonimo app to send MIDI through a bus, please see Using the standalone app with any DAW

Harmonimo Standalone

Using the standalone app with any DAW.

Use a virtual MIDI bus to route MIDI from Harmonimo standalone into your DAW.

Mac

  1. Set up a virtual MIDI bus (see "Setting up a virtual Midi Bus." below)
  2. Open Harmonimo and in the Menu Bar, navigate to 'Harmonimo' > 'Settings'.
Harmonimo Settings Menu
  1. Set your MIDI Output to the virtual bus and click apply.
MIDI Output Settings
  1. In your DAW, set a track's MIDI Input to the same virtual bus
DAW MIDI Input

Play notes in Harmonimo and your DAW receives the chords, This lets you use Harmonimo's standalone app while your DAW handles the sounds.

Setting up a virtual Midi Bus.

A virtual MIDI bus lets you send MIDI between apps on the same computer, like routing Harmonimo's output to your DAW.

  • Mac
  • Windows

Mac
macOS has a built-in option called the IAC Driver:

  1. Open Audio MIDI Setup (search for it in Spotlight)
  2. Go to Window → Show MIDI Studio
Show MIDI Studio
  1. Double-click the 'IAC Driver' icon
IAC Driver
  1. Check Device is online - you can rename the port 'Harmonimo' to keep things tidy
IAC Driver Properties

Once enabled, Harmonimo standalone can send MIDI to any app or DAW.

Windows
Windows doesn't include a virtual MIDI driver, but there are free options:

  • RTP loopMIDI by Tobias Erichsen — lightweight and reliable.
  • MIDI Yoke (part of MIDI OX Utility) — older but well-known. Note: 32-bit only, so won't work with most modern DAWs.

Setting up a virtual Midi Network

You can set up a virtual MIDI network to stream MIDI data such as MIDI Note, MIDI Control Change, and MIDI Clock messages from one computer to another computer or device.

  • Mac
  • Windows

Mac
On Mac, you can use the built-in virtual MIDI network.

  1. Launch Audio MIDI Setup and select 'Window' > 'Show MIDI Studio' from the menu bar.
Show MIDI Studio
  1. Now select 'MIDI studio' > 'Open MIDI Network Setup...' from the menu bar.
Open MIDI Network Setup
  1. You can create a Session which will be seen by all machines/devices connected to the same network. To do this, click on the + sign in the My Sessions part of the window and edit its "Local name" and its Bonjour name. Note that the Bonjour name will be the name that is visible to other computers.
MIDI Network Setup Session
  1. You need to enable the checkbox, next to your Session name in the list - and edit the dropdown to allow others to connect to you.
Enable Session
  1. By enabling the Session, the Network MIDI port will appear in any MIDI network capable application or device.

Windows
Windows computers don't provide an in-built solution, but there is a great freeware utility courtesy of Tobias Erichsen which allows the use of MIDI via network.

It's also Bonjour compatible, which lets you connect Macs and PCs on the same network.

Using virtual MIDI buses
If you want to stream MIDI data between different applications on the same computer, you can use a virtual MIDI bus instead. See our dedicated article: Setting up a virtual Midi Bus.

Focus on music.
We'll handle the math.

Harmonimo started as a passion project for our tiny two-person team. This release is pay-what-you-want, so you can start using it for free today. If you love it and want to support what comes next, our suggested price is $45.

Get on  
Harmonimo